|
Short stories about the inspiration and execution of my favorite photographs by Crested Butte, Colorado photographer, Dusty Demerson How the Art Happens - Reflecting on West Beckwith
May 29, 2019
•
Leave a Comment
Reflecting on West Beckwith Mountain About twelve years ago I started teaching photography workshops and leading photo tours. My buddy, J. C. Leacock and I decided to lead a weekend fall color workshop here in Crested Butte at the end of September. Back then, the end of September was usually the peak of our autumn aspen extravaganza and seemed like the perfect time to capture some new images with some new friends. We ended up with 6 "students" for our first workshop. Friday evening we got to know each other over dinner and prepared to head out before sunrise the next morning. We would photograph all morning, come back to town for lunch and editing, meet again late in the afternoon to share our best photos before heading out again for evening and sunset photos. Sunday we would repeat the procedure except for the sunset session. All went as planned on Saturday and everyone created some great new images and learned new techniques. Sunday threw us a curve ball though. We woke up to fresh snow. If you've ever spent much time in the mountains then you know what a blessing it is to have brilliant, golden aspen leaves surrounded by fresh snow. It doesn't happen every year but when it does, you know you're going to capture some spectacular photographs. We quickly agreed to head up to Lost Lake, betting we would be the only ones there. Our gamble paid off. We helped our students set up and compose photos while the sun slowly rose higher in the sky. We had been working quickly since the light was changing quickly and it was pretty cold at 10,000 feet. After about an hour or so everyone seemed to be ready to move on. J. C. was getting everyone back in the trucks when I had the idea of this panorama. I quickly set up and leveled the camera before making 7 overlapping photographs of the reflection of West Beckwith Mountain in the Lost Lake Slough. The still water created the mirror image. The snowy shoreline created the perfect frame. When lakes get low in late autumn they develop this bath-tub-ring effect around the shoreline. It's usually ugly and a feature I would avoid photographing. This time it became the frame for my subject. It really only works because of the snow in my humble opinion. I would not have made the photograph if there had been no snow. We got everybody loaded up and headed to our next location. I quickly forgot about the panorama I had captured. It was several days later that I pulled the files off the camera and into the computer and rediscovered this shot of the sunrise on West Beckwith Mountain reflecting in the lake. How the Art Happens - The Hand of God
May 22, 2019
•
1 Comment
The Hand of God I moved from Oklahoma to Colorado over 30 years ago. Chasing amazing skies was a frequent occupation while I lived in Oklahoma. It is well known for putting on impressive aerial displays of colorful clouds and storms. The mountains of Colorado are spectacular in their own right but the clouds up here can rarely compete with the skies of the plains. But, occasionally there are exceptions. While traveling to Grand Junction one late summer evening I approached this singular cloud reflecting amazing sunset colors and dropping red rain. I had to get a picture of this! I was driving on US 50 between Delta and Grand Junction. The two-lane road was narrow back then and had no shoulders. It was tough to find a place to get off the highway. The light was changing really quickly. I was in a panic that I might not get this photo. Eventually, I did find a spot to pull off the highway. I quickly grabbed the camera, a Nikon FM2 which already had my 28mm wide angle lens on board. I put the camera on the tripod and set it up. Did I mention that the light was failing fast? I didn't feel like I had time to meter the scene so I set the exposure to "A" for aperture priority, allowing the camera to choose the shutter speed. The lens was stopped down to f11 or f16. The film was a new ISO 100 product from Fujifilm called Reala. I pressed the shutter button. The exposure was about 5 seconds or so. That's when it happened. During my exposure, there was a lightning strike. I heard the shutter close. I couldn't believe my luck. So, I pressed the shutter button again. And again. And again, until the light completely failed and the sky was dark. There was no more lightning. There had been no lightning before either. The only lightning strike from this little storm was captured on my film! I'm the luckiest photographer on the planet! I don't really believe in luck, however. I believe in planning, preparation, and patience. I also believe in gifts. This evening, I was given a gift, a once-in-a-lifetime photograph that no one else saw or captured. It had almost nothing to do with planning, preparation, and patience. It had almost nothing to do with me! It was a gift. And that's why it's called "The Hand of God". How the Art Happens - East River Green
May 15, 2019
•
Leave a Comment
East River Green The East River drains snowmelt from the Raggeds and Maroon Bells - Snowmass Wilderness areas northwest of Crested Butte, Colorado. While traveling between the historic mining town turned research facility of Gothic and its intersection with the Slate River below Crested Butte, it meanders through a broad valley like a snake. Photographers from all over the world have admired the views of the river as it snakes its way toward Gunnison. The vantage points, however, are few and far between. Dense forest and mountainous terrain leave only a few good views of the river below. For most of this route, travelers are a few hundred feet above the valley floor. That fact gave me an idea. For years I have imagined a photograph of the meandering East River leading eyes to the towering laccolith of Crested Butte Mountain. But there was a problem. None of the vantage points offered that point of view and it would be a treacherous, if not impossible, flight path for a small plane. So, for years the image of the lazy, winding river leading to the mountain I envisioned was just a dream. But, technology came to the rescue. A few years ago the solution presented itself with the availability of flying cameras also known as drones. The flying camera was the perfect solution to this low-elevation aerial photograph in the middle of a deep valley. To achieve "East River Green" I actually flew the route three times. The first time was about a month too early with patches of snow and mostly brown foliage. The second time spring winds made flying difficult and I could never find the right composition. The third time was the charm though. The camera placement ended up about 350' below from where I launched and nearly a half mile down-river. I was able to monitor the flight on my iPad to get the composition and elevation just right. Once I get the photo I'm after I usually simply instruct the drone to "return to home" which I did this time. However, I was in for a surprise when a window popped up informing me that I didn't have enough battery power to get the drone back. Dang! I really was not looking forward to a mostly vertical hike with a slim chance of recovering my flying camera. Instead of panic, I decided to try and get my quadcopter as close as possible to my location. I flew up to about 50' above the launch elevation so I could clear the nearby trees and then straight back toward my spot. The controller was beeping "low battery" the whole way. But, I made it! Just barely. And, I got the shot, "East River Green". If you would like to know more about what I have learned about using drones in landscape photography, here is a link to an article I wrote a while back. Using Drones in Landscape Photography
How the Art Happens - Snow Tango
May 08, 2019
•
Leave a Comment
Snow Tango Midway between Crested Butte and Gunnison, Colorado, like towers in the middle of the pasture, there are these two Cottonwood trees. Years ago someone installed a tire swing from the high branches. It's been there for as long as I can remember. I travel past this scene several times a week. Occasionally I'll see someone pulled over to the shoulder and taking pictures. I never did. Until this one day. Fresh snow had softened the dark branches giving them a velvet-like texture in the diffused and foggy light. The fog hid most of the background of houses, fences, cattle, and corrals. The trees were close enough to the road that the fog had little effect on them. They almost glowed against the white surroundings. The scene was almost, but not quite, monochromatic. The subject was completely isolated against the normal confusion of its background. So, I stopped and made a few photographs. I played with a variety of focal lengths until I discovered a comfortable composition with just the right amount of subject and space. Some people refer to the empty space around the subject as "negative space". I believe that name is kind of negative and I think that space is extremely positive and necessary to create a compelling composition. This is the presentation I have settled on. To see what it looks like on canvas click on the link. I hope you enjoy "Snow Tango". I always struggle with titles for my work. I shared this image on my Facebook page and asked for help coming up with a title. Several friends offered suggestions but a dear friend from college turned me in the right direction with her suggestion of "Spring Tango" which I chose for the first prints. While the photo was actually made in the spring, that season here in the Colorado Rockies really looks more like winter everywhere else in the country. I think the "Snow Tango" title makes a little more sense. How the Art Happens - On the Path to Solitude
May 01, 2019
•
Leave a Comment
On the Path to Solitude I love to drive and explore places I've never seen or revisit places I've been during different seasons. Northeast New Mexico is a vast landscape with little to attract attention. That may be what I like most about my time spent there. Finding subjects for photos is truly a process of discovery. While traveling to visit family one winter, I spent the night in Las Vegas, New Mexico. It's a small town northeast of Santa Fe with lots of history in its past. I awoke to a fresh dusting of snow and hit the road early in the hope of finding a photographic subject while the light was still interesting. Just a few miles of driving provided me with just what I was hoping for. A quiet highway, wide open vistas, and soft, warm sunrise light set the mood. This abandoned homestead and windmill sat just far enough off the highway to allow the snow-filled rutted drive to create a great leading line into the scene. I could have photographed the scene with a longer lens to bring my subject closer but that approach would eliminate the feeling of space and isolation. To enhance these feelings, I chose to use a panoramic format. Even though we are usually taught not to place our horizon or subject in the center of the frame, there are times when that approach creates the most powerful composition. This approach is especially appropriate with panoramas. The composition strengthens the feelings of isolation, space, and solitude. Even though I played with other compositions and lenses, none of them evoked the feelings that I was experiencing with this scene. The vastness of the space, the interesting sky, the warm light, and the snowy foreground all worked together to provide an image of quiet solitude without being lonely or depressing. I hope your response is the same as mine! The first print from a limited edition of 25 on canvas and ready-to-hang is available at a discounted price right now. "On the Path to Solitude" could be yours!
How the Art Happens - There's a Delicate Nature to Spring
April 24, 2019
•
Leave a Comment
There's a Delicate Nature to Spring I love aspen trees. They grow straight and tall and they do it quickly. They also can grow in very dense forests that you can barely walk through. Unlike the oak trees I grew up with in Oklahoma, aspen trees lose all of their leaves every autumn. We call that "stick season" and it lasts through the winter until May or so. Aspen forests represent a variety of moods for me. As they begin to leaf out in the spring they exude joy and freshness. As their leaves turn dark green into summer, they just seem kind of normal, the way I feel most days. As they change to their golden shades in the fall they seem exuberant like they're celebrating a great life. Then comes "stick season". Bare aspen trees invite quiet contemplation. They're not really depressing but rather introspective. During April and May, we usually get our moisture in the form of snow. At 9400' in Colorado, that's just the way it is. Sometimes we get measurable snow in every month of the year. Springtime in the Rockies brings multiple light flurries of snow that do a great job at decorating bare aspen forests. The dusting of white reminds me that the trunks and branches are not really white at all but a variety of shades of grey. The light snowfall adds a little contrast to an otherwise dull landscape. "There's a Delicate Nature to Spring" celebrates springtime in the Colorado Rocky Mountains for me. This image makes me think of moods changing from quiet contemplation to the promise of future joys. I hope it makes you feel the same! How the Art Happens - Shelter From the Storm
April 17, 2019
•
Leave a Comment
Shelter From the Storm I loved this old barn. I drove past it several times each week, in every season, at every time of day, in every kind of weather, in every kind of light. I have probably photographed it a hundred times. On this particular January morning a few years ago, I awoke to a fresh frosting of snow and hoar frost on every post, branch, wire, and stationary object. I was trying to decide the morning's photo subject while enjoying my breakfast. The hoar frost disappears immediately when the sun hits it so I knew my time was limited. There was something else about that morning though. Because of the frost, almost everything it covered had lost its color. Now, that was cool (literally)! I suddenly remembered this old barn between Crested Butte and Gunnison. The lines of the trees on the slopes above the barn would bring your eyes straight to the barn. The only color in the picture would be the warm, brown timbers of the old logs and planks used to build the barn. The fresh snow would help clean up anything on the ground creating a scene with minimal distractions from the warmth of my subject. The only challenge would be to get close enough to get the highway, fence, and ditch out of the scene. I jumped in the truck and headed down the valley to the barn. The sky was still grey and overcast which really helps soften the view and eliminate distracting shadows. Plus, cloudy landscapes have a different mood to them than sunny days. I don't think this photograph would work at all on a sunny morning. It would have a completely different feel. I photographed the barn from several angles and compositions. My short telephoto lens was the perfect solution to eliminating the fence and foreground distractions. It also helped compress the space between the barn and the angled trees above. The "frosting" was perfect, creating a scene reminiscent of hand-tinted photos from the turn of the century. The wooden barn was simply glowing! I knew I would be happy with the images captured that morning even though I was not sure which composition would be the strongest. What I did not know was that "Snowmageddon" was going to begin later that morning, bringing almost 6 feet of wet, heavy snow in the next several days. After weathering nearly 100 years of Rocky Mountain weather the ridge post cracked under the weight of new snow and the barn came down just a few days later. As it turned out "Shelter From the Storm" just wasn't enough shelter after all. There is a sadness that fills the valley when iconic structures disappear. How the Art Happens - Death Valley Dunes
April 10, 2019
•
2 Comments
Death Valley Dunes It seems our weather works in cycles. This winter and spring have been very wet on our western coast bringing plenty of rain and snow to typically-dry California. The winter of 2005 experienced much the same rainfall in the deserts of the west coast. I had just closed my retail photo lab and was trying to figure out how to pay my bills as a full-time landscape and freelance photographer. The nightly news was filled with stories of the rare "super bloom" in Death Valley National Park. Colorful wildflowers covered the usually brown and grey hillsides of this sand-filled valley just like this spring. I had never been to Death Valley. About a week into seeing these amazing pictures, it dawned on me that I could go experience this event for myself. And, of course, make photos to sell and share. I packed up my 13-year-old Nissan Pathfinder and headed west. I planned on camping in the park so I could catch sunrise and sunsets in great wildflower locations. I arrived at a national park experiencing 105-degree temperatures and 50 mph winds. The "Super Bloom" was over. I missed the flowers by two days! Rather than heading back to Colorado's cold and snow, I decided to stay and make the best of the long drive. I decided not to camp. The first day was spent driving around and getting the lay of the land. I always visit the visitor's centers in national parks. I always learn a lot and it's a great place to pick up a map and get some suggestions from park rangers. They know all the best spots and times to visit! The next day was spent trying to make photos in hot and windy conditions which were not remotely productive but that evening the wind died down enough to allow me to camp in the park. I had driven by the sand dunes at Stovepipe Wells several times but the wind and mid-day light made them unappealing. My third morning in the park looked promising with light wind and much cooler temperatures. I headed to the dunes for some early-morning light only to find a photographer in a bright red jacket set-up on the tallest dune. There was no way to shoot around him. He seemed to stay there most of the day. Dang photographers! I ended up spending the day driving to Scotty's Castle which was one of the most interesting resort areas I have ever visited. It was devastated a few years ago by flood and mudslides. Very sad My third and final day in the park welcomed the wind back to the valley but, at least there was no photographer on top of my subject, sand dune. I made a handful of images fighting flying sand and moving subjects. If you look closely, you can see the sand blowing off the dunes. I think the tripod might have been moving too because there was nothing really sharp in any of the pictures. Major fail! A few years later, while reviewing old photos, I came across this image with new eyes. I was captivated by the shape of the dunes, the light and shadow, and, yes, the motion of the sand. I get an almost serene sense of peace when looking at the shapes in this photograph. While the image was not captured in a panoramic format, I decided the grey mountains in the distance really didn't do much to support the more interesting part of the photo so I cropped most of the top of the frame. The colors were not really helping either. The tan/orange dunes contrasted with the blue/gray mountains creating too much color contrast in the image. I wanted to keep the feeling of warmth but subdue the color. A deep sepia tone became the answer after much experimentation. A little bump in contrast, a little addition of film-like grain, and a lot of dark vignetting provided the finishing touches to "Death Valley Dunes".
How the Art Happens - A Celebration of the Ancients
April 03, 2019
•
Leave a Comment
A Celebration of the Ancients Mesa Verde National Park is truly one of the gems of the National Park system in the US. The park provides the ability to travel back in time nearly a thousand years and experience the lifestyle of Anasazi or Ancestral Puebloan people. And you don't only get to look at their homes and workplaces. You get to touch and feel the stone, walk through the canyons, smell the air, and see the same skies. A few years ago I was reading in the Denver Post that the park staff at Mesa Verde were going to illuminate the Cliff Palace ruin with farolitos as a practice for their celebration of the 100th anniversary of the National Park System. The event was to be open to photographers only. This seemed like a once-in-a-lifetime experience that should be photographed if the weather cooperated. I put the event on my calendar. Sure enough, December 9, 2015 rolls around and the weather is going to be perfect at Mesa Verde. I headed south for the 4-hour drive to the park and found a place to stay in nearby Cortez, Colorado by late afternoon. Arriving at the park around 5 pm, I discovered that the park officials were letting anyone with a camera come in for the event. Even cellphones were included. It turned out to be a zoo! There were several hundred "photographers" staking-out their personal space along the overlook of Cliff Palace. I have always believed that my job as a photographer is to show my viewers something they would not have seen on their own. It's my job to either capture something they would never be able to see or, at least, show it in a way they didn't think of. Through timing, composition, and technique, I'm supposed to tell part of the story of my subject. As the evening progressed many of the people quit taking pictures and were standing around talking to each other and the several park rangers there to keep us under control. By the time it was really dark, most folks had left leaving about a dozen of us with easy access to the best locations. I knew that the Rangers were going to turn off the lanterns at 8 pm. I was trying to photograph as many different variations as possible while the lights were still burning. The sky had been thinly overcast all afternoon eliminating any kind of sunset light and keeping the stars from showing. Just before 8 pm, the sky started to clear giving me a soft view of only the brightest stars. I knew it would be a technical challenge but I had to try and capture the stars above Cliff Palace. I just couldn't get the exposure of the bright lanterns to allow the stars to show. I ended up combining two frames, one of the ruins and a separate image of the sky to achieve my vision for "A Celebration of the Ancients". I hope you like it.
How the Art Happens - Winter Melody
March 27, 2019
•
Leave a Comment
Winter Melody I pass by this grove of aspen trees several times each day. When I look at them from this angle, directly across Washington Gulch and from slightly above the trees, they remind me of a musical score. I am very happy that Gunnison County road and bridge department has created a pull-out right where I need it. Most winters I still have to climb the snow banks to get a good point of view. I set out to capture "Winter Melody" many years ago. I have photographed this stand of aspens in every season and in every type of weather. I have several versions that I like. They are all in a panorama format because to include more image below the trees would introduce a lot of boring sagebrush or white hillside. Above the trees, you begin to see the Pitchfork housing development which completely kills the mood of the image. The winter version above captures the essence of the musical score much better than any other season. The delicate branches and trunks help reinforce the idea of music. This took me several "mistakes" before I realized that the trees had to have just the right amount of snow hanging on the branches. Less snow made the scene too contrasty and a little too stark. The dusting of snow really enhances the delicacy and softness of the scene. To capture the dusting of snow required several trips after snowstorms with poor results. Either the snow had blown out of the branches or the sun had hit the grove melting the fresh snow. Slowly, but surely, I was putting the image together in my mind by making lots of weak photos that did not tell the story the way I envisioned. On January 12, 2009, everything finally came together. I got the photograph that I had been trying to capture for nearly 20 years. There was enough snow to cover the sage and the hillside. There was the perfect amount of fresh snow hanging in the branches. The sky was overcast and the sun had not risen so there were no ugly shadows to distract from the musical arrangement of my favorite aspen stand. I have printed this image in color and monochrome. The black and white version seems to state the idea a little better but there really is little difference since there is very little color in an aspen tree. I have presented this image as a gallery-wrapped canvas print and also as matted and framed prints. I love the canvas version but it requires a wall with color. It looks awful on a white or off-white wall. The matted and framed versions are a lot less picky since the frame and mat provide a buffer for the nearly-white image. Check out a framed version of "Winter Melody" here. If you enjoy reading about how and why my images are created, you can be the first to get these blog posts and special offers on prints including my Print of the Month offerings by signing up here. I promise not to share your information with anyone else. You can also comment on these posts at the top of the page near the date. Thanks for reading! How the Art Happens - The Last of the Winter Bones
March 21, 2019
•
Leave a Comment
The Last of the Winter Bones For me, spring is the most difficult season to create images. I live in a small town 9,400' above sea level and we usually have snow on the ground until June. Many of our back roads close in November and don't reopen until late June or even later if we've had a snowy winter and a cool spring. Spring snow is ugly. There's lots of mud. Roads are brown. The trees are bare. The grass is brown. There are very few flowers. The few flowers of spring are tiny and only get a few inches tall. The sky is frequently grey. The afternoons are windy. We usually can't get into the forests until after the trees have completely leafed out. If it sounds like I'm not a big fan of spring up here, you would be mostly correct. Making images is a real challenge! But, then there was last spring. Last winter did not bring us much snow. The spring was warm. The snow melted pretty quickly which opened the back roads much earlier than usual. The forests turned green and we could actually get into them. It was gorgeous! The full range of spring aspen colors were easy to witness from roads and trails high up in the mountains. So, here's the thing about spring aspen leaves. They start as tiny, lime-green clumps. Some call them "kitten's toes". They look like pale, green dust on the trees. This only lasts a day or two. Then they get bigger and darker green but still not the dark green of fully-formed leaves. This level of maturity also only lasts a day or two so you have to get out there every day. It may only take a week or so for an aspen forest to go from bare to full green foliage. When spring aspens call I usually come running. The season is so fleeting you can miss it if you sleep-in. But, the real reason to be out there is the quiet. The solitude. The peace. And the exploration. Spring brings feelings of new life, fresh starts, earthy smells, sounds of a living universe. New growth and, of course, green. "The Last of the Winter Bones" is one of my very favorite spring photographs. It was discovered on the west side of Kebler Pass in 2018. I just love the contrast of the white trunks and branches with the sea of pale green leaves on the mountain side. An overcast sky helped soften the lighting so there were no deep shadows. The darker conifers provided just the right amount of tonal contrast to keep the scene interesting. The small clearing in the lower center offers a different visual density than the rest of the image which tends to draw the eye. To enhance that effect, I used a little selective vignetting or, as we called it in the darkroom days "burning in". Like Ansel Adams, I like to darken the edges of most of my prints to keep the viewer's attention away from the edges of the image. That's how "The Last of the Winter Bones" was made. It got its title because bare aspen trees resemble bones and the trees in the clearing were late to leaf. To be the first to see these stories you can subscribe to the blog above in the sidebar. For more information about owning "The Last of the Winter Bones" click here.
How the Art Happens - Vintage Crested Butte
March 14, 2019
•
Leave a Comment
Vintage Crested Butte
This post will be the first of a series talking about how some of my best-selling images have been created and, more importantly, why they were created and what they mean to me. I hope you enjoy this series.
I have been a photographer most of my life with my interest beginning in high school and eventually leading to a degree in photojournalism. Back in the '70s, while I was in school, black and white photography was the method taught in school and used most in newspapers. I love black and white photography even though I rarely use this approach today. A monochrome photograph makes a viewer think about the subject without the distraction of color and realism. It presents the subject in a more abstract version requiring more attention. Back in the "olden days" color photographs were not an option. But, photographers tried to add color to black and white images, for their own reasons, which I will not go into. They would use transparent oil paints to add color to their black and white prints using brushes and cotton swabs. These hand-tinted prints were quite popular and became the first color photos. I really like the hand-tinted look, especially when it's not applied to the entire image but only key elements. This spot-color technique has been used for years in wedding, portrait, and advertising photography. Remember the Cherry 7-UP commercials from the '80s? I invested untold hours into trying to learn this technique with extremely poor and sloppy results. Perhaps it was my love of coffee or just lack of patience, but I could never create a hand-tinted image I was happy with. I was a frustrated artist when it came to hand-tinting photographs! Many years later, most photographic artists use digital photography to express their statements. Me too! The tools and techniques available to us today are amazing and finally allow us to create our visions of images that we only dreamed about 50 years ago. If he were alive today, I'm sure Ansel Adams would be crafting his amazing images using digital tools. The huge added benefit, today, to creating our photographic artwork, is that we only have to create one "original". Using older techniques, I would have had to hand tint every single print, one at a time. I'm not sure I would have ever earned minimum wage with my skills. About 30 years ago I moved to my favorite little Rocky Mountain town of Crested Butte, Colorado. It sits at the end of the pavement, in a broad valley beneath towering peaks to the west. The town began as a mining town in the late 1800s and the original architecture is decidedly Victorian and very colorful. The landscape dwarfs the town. This is the story I was trying to tell with this photograph. Colorful town. Towering mountains. Dwarf town. Broad valley. Beautiful. I made this photo, originally, in color. It was pretty. The mountains looked "towering". The town was dwarfed. The buildings were lost in the lovely, however. How can I make the homes stand out in the scene? They are visually, such a small part of the landscape. I troubled over this photo for quite a while before I had the thought. "Hey, what about that spot-color, hand-tinted approach you like so much?" I had never really tried the approach using my digital tools but it had to be easier than using oil paints and toothpicks. It was! The result is the artwork I call "Vintage Crested Butte". It's just, exactly, what I was trying to present. (And I only had to do it once!) To learn more about the actual technique of digital hand-tinting see this blog post. I hope you enjoy my photos. I would love to know your thoughts. You can leave a comment at the top of the post by the date. Changing Perspective - Using Drones for Landscape Photography
January 24, 2018
•
Leave a Comment
About 5 years ago I purchased my first quadcopter with the idea of offering a new perspective of homes and properties for my real estate clients. I quickly learned that this was not a great idea. First of all, I had to use my GoPro camera for the pictures. While GoPro cameras are great for home-video use, they produce pretty lousy still images and making decent prints proved to be nearly impossible. If that wasn't enough of a problem, the early drones were a challenge to fly and hated even a mild breeze. Composing images was also difficult since viewing the scene through the camera required a lot more equipment that seldom worked well. To add insult to potential injury, the early drones operated on the same frequencies used by other devices and had a bad habit of flying away if you got a phone call. I sold my first Phantom quadcopter within 6 months and put the aerial photography idea on the back-burner for a year or so.
Eventually, DJI came out with the Phantom 3 which seemed to solve a lot of the early issues so I bought one. The still image quality had improved a lot since the camera was built-in and was attached to a gimble to keep the camera level while flying. This Phantom was a lot easier to fly and much more stable. I got some great images. I discovered how much fun it would be if I were 200' tall! A few months after I purchased the Phantom 3, DJI came out with the Phantom 4 which had even better features and a much better camera. They got me again!
This new drone was extremely easy to fly and captured nice, high quality still images. It offered much better flight times as well. Using my iPod mini, I was easily able to compose my photos and operate the drone controls via the touch-screen. I could also use my smartphone but found the screen too small to use efficiently. Most of my early images were created well under the 400' maximum allowed and I seldom did much moving once I was in the air. Since I have always worked out locations in my mind before grabbing a camera, the drone usually just went straight up and then straight down. With practice, this approach was quickly modified beginning with the image below. I have always had this shot in my mind but it required the drone and some flying that really messed with my mind. Besides operating a flying camera over half a mile away, the drone was also nearly 300' below me. I think it was worth the terror of having to climb down there to retrieve my camera if things went horribly wrong. So, now I've been actively using a DJI Phantom 4 Pro quadcopter for about a year. I'm making some images that are good enough to make decent prints and offer for sale. I don't use the video features at all. There are plenty of other local photographers who offer video services and most of them don't offer still images. I like not having a lot of competition. The real estate market never really materialized since most of the realtors just bought their own quadcopters. They are fun to fly! Here are a few things I have learned in the past year. 1. The camera can always be better. 2. Balance your props for sharper photos. 3. Pay attention to your composition. 4. Plan your images in advance. The landscape looks a lot different from 200' - 400' above. 5. Keep your ears open for planes and helicopters. 6. If you get an audience gathered around you, it's best to just land and come back later. 7. Just because an image looks cool doesn't mean people will give you money for it. 8. It may take some time for low altitude aerial images to be considered as art. 9. Wide angle lenses make it really easy to fly into trees. 10. Keep flying and looking for new ideas. 11. Animals can act pretty strange with a drone overhead. Plan accordingly. 12. Pay attention to your battery power. 13. Check your firmware/software for updates before leaving the office.
While selling fine art photo prints of my aerial images has been a little disappointing so far, the sales of these photos as stock have done pretty well. By the way, the green color of John Deere equipment is considered intellectual property and the licensing of images that include that equipment is a copyright violation. (I'm learning new stuff with this drone.) The drone is still fun to fly and any work we can do while having fun is a bonus. As an experiment last summer, I tried using the drone platform to shoot a panorama. With the 20 - 24mm lens equivalents of drone camera lenses, this proved to be a challenge for my stitching software. I generally overlapped images about 50% but learned that this approach would not make a great panorama from the air. I found I had to overlap images about 75% if there are details like roads and buildings to blend. If I don't do this, I end up with some really weird and unpleasant stitching failures of lines that should be straight. That said, some of these aerial panoramas are great! Give it a try. The panoramas have been my best-sellers as stock photography.
Thanks for reading. Feel free to share a link to this page if you found the information useful. To see more of my aerial images visit the "Signature Prints" section of my website: https://www.imagescolorado.com/p308719591
Preparing Photos for Social Media
October 16, 2017
•
Leave a Comment
Social media like Facebook can be a great and free marketing tool for our art. Lots of photographers post images every day. I try and do the same but definitely fall short of the every-day post. Making our images look fabulous on social media takes a little extra time but is worth the effort. Most of us try and use large color spaces like Adobe RGB or Pro Photo RGB to edit our images. These spaces are great for prepping photos for printing but not so great for internet viewing. Internet images must be converted to sRGB for display on the web. If you don't do it, Facebook will. Guess who will do a better job! That's right...you. Size also matters. I usually shrink my Facebook files to 2048 dpi on the longest side. This creates a great looking photo on Facebook. I ALWAYS add a watermark logo before posting too. Smaller than 1024 dpi and you'll run into pixelation problems. Larger files are a waste of time since Facebook will reduce them anyway. Here's how my workflow goes: 1. Work my magic on the image using layers and a large color space like Pro Photo. 2. Save my work as a PSD or TIF file. 3. Shrink the file to 2048 dpi on the long dimension. Flatten the image. 4. Convert the color space to sRGB. 5. Add a watermark in the lower right or left corner. 6. Save as a .jpg file at level 10 in a new (Facebook Photos) folder. 7. Now feel free to post this image to Facebook, Instagram, or whatever social media platform may show up tomorrow. Enjoy.
How to Photograph a Solar Eclipse
August 07, 2017
•
Leave a Comment
Way back in May of 2012 we had a solar eclipse visible in the southern part of the USA. Since successful viewing of an eclipse requires a clear sky, I was not willing to commit to driving any distance in the hopes I would be lucky enough to witness this event. I had at least a 50/50 chance of missing it due to weather.
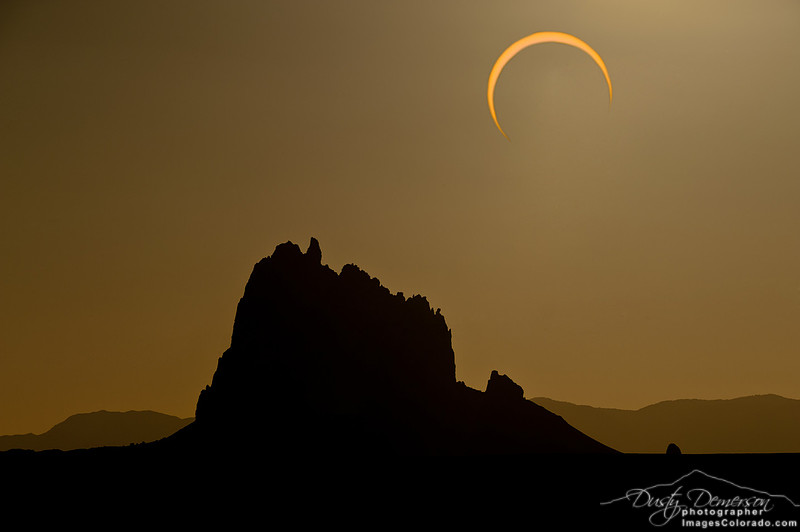
I went to breakfast that morning near my home in Crested Butte, Colorado and check the weather and the track of totality for my area while I waited for my bacon. As it turned out, the weather would be perfect. The nearest landmark along the path of totality was Shiprock, New Mexico. That's about a 5-hour drive from my home but, since it was May, I had nothing better to do than driving to Shiprock for the evening eclipse.
I had an idea of the photo I was hoping to get but I had never photographed an eclipse before and rarely point my cameras toward the sun, even for sunsets. I had a lot of time to think this thing through but no time to practice my technique.
After arriving at my destination I had a few hours to find a perfect location. Much of the land around Shiprock is Navajo Nation private property and I knew from previous visits that they can get pretty excited about people crossing fences and even driving on their roads. I staked out my place along the highway in the state's right of way just to be safe. I was not alone!
Getting the mountain and the sun in the same shot was my goal but I really didn't know exactly where the sun was going to be when it was eclipsed. I ended up using my 80-200mm, my 300mm, and my 400mm lenses for the photos. My first shot was using the longer lenses just to capture the shadow of the Earth falling across the sun. I quickly realized that getting an acceptable exposure while looking into the sun was going to make it impossible to see any kind of landform or mountain. If I exposed for a dark sky with a little foreground the sun would be too blown-out to see the shadow of the earth. Bummer! I also came to the realization that if I properly exposed the totality of the earth's shadow within the outline of the sun I was going to get a really boring image. I could easily create this graphic in Photoshop without having to travel to another state and hope for good weather! So, as I continued to make images with my long lenses and work through the exposure issues, I realized another problem. When I shot with my 80-200mm zoom I got lots of unwanted lens flare and ghosting of the sun/earth part of the image. I hate lens flare! I know it's really popular in a lot of portrait situations but for a landscape photographer, it's bad news. What to do?
As it turned out, the location I had chosen was about perfect. Except for the power lines and pole. I was able to achieve a good exposure using HDR techniques and an exposure range of about 6 stops to achieve the photo above. I still wasn't thrilled with the power pole and the size of the sun was a little underwhelming. Since I think using HDR for my landscape photos is cheating just a bit, I decided to cheat some more and try a composite image. The photo/illustration below is my final result. I'm pretty happy with it. It involves a 6 stop HDR shot of the mountain with most of the lens-flair and ghosting retouched composited with my favorite frame of the earth eclipsing the sun. It's not perfect. It was a huge amount of work using a lot more post processing than I'm comfortable with but I'm pretty happy with the result. I hope you all have fun chasing the next eclipse later this month. Happy hunting!
|